Microsoft fixing all bugs of FileCodeModel in VS 2015. And fast.

In this post I blogged about nine bugs introduced in the FileCodeModel of Visual Studio 2015 by the new Roslyn-based implementation. Those bugs were “critical” (that is, no easy workaround) and were fixed in the next days.

Then I reported two additional bugs that were less critical for me since I could implement workarounds:

EnvDTE.CodeElement GetStartPoint(EnvDTE.vsCMPart.vsCMPartBody).Line returns wrong result if declaration uses more than one line

EnvDTE80.CodeProperty2.ReadWrite returns always read-write value for VB.NET body-less properties

Those were fixed too. And two days ago I reported a couple of new critical bugs (no workaround) that I discovered:

EnvDTE.CodeFunction.FunctionKind causes COMException for Sub New() in VB.NET instead of returning vsCMFunction.vsCMFunctionConstructor

EnvDTE.CodeFunction.StartPoint, EndPoint, GetStartPoint, etc. cause exception for VB.NET “Declare Sub”/”Declare Function” methods

And those two have been already fixed on GitHub and will be in the some of the next Visual Studio 2015 CTPs.

It is also very incredible the level of transparency that Microsoft has now using open source for Roslyn on GitHub, where you can see the new code that fixes the bugs, the added unit tests, which MS developer is actually working on the fixes, who is reviewing them, etc.

So, thanks Microsoft for all!

MZ-Tools Articles Series: HOWTO: Get Git Branches, Commits, Changes, Conflicts, etc. in the Team Explorer of Visual Studio

The next five articles / samples that I have created about Team Explorer extensibility are about getting the information contained in the Git-related pages of the Team Explorer of Visual Studio 2013.

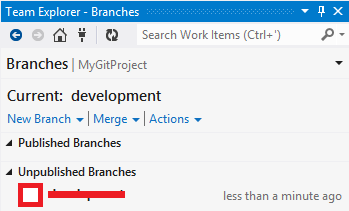
The Branches page contains the current branch and the Published and Unpublished sections:

TeamExplorerGitBranches

To get that information from a package you need to use the Microsoft.TeamFoundation.Git.Controls.Extensibility.IBranchesExt interface. See the article:

HOWTO: Get the Git Branches in the Team Explorer of Visual Studio from a package

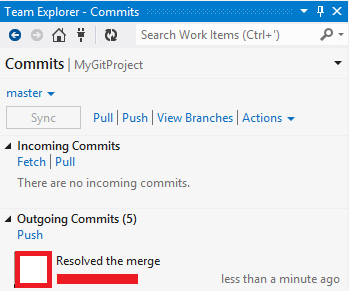
The Commits page contains the Incoming Commits and Outgoing Commits sections:

TeamExplorerGitCommits

To get that information from a package you need to use the Microsoft.TeamFoundation.Git.Controls.Extensibility.ICommitsExt interface. See the article:

HOWTO: Get the Git Commits in the Team Explorer of Visual Studio from a package

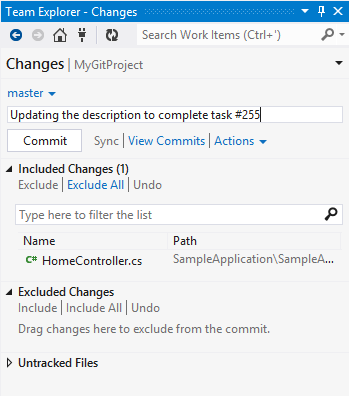
The Changes page contains the Included Changes, Excluded Changes and Untracked Files sections:

TeamExplorerGitChanges

To get that information from a package you need to use the Microsoft.TeamFoundation.Git.Controls.Extensibility.IChangesExt interface. See the article:

HOWTO: Get the Git Changes in the Team Explorer of Visual Studio from a package

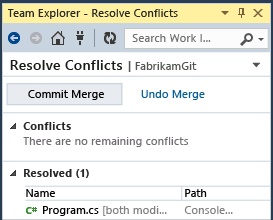
The Resolve Conflicts page contains the Conflicts and Resolved Conflicts sections:

TeamExplorerGitConflicts

To get that information from a package you need to use the Microsoft.TeamFoundation.Git.Controls.Extensibility.IConflictsExt interface. See the article:

HOWTO: Get the Git Conflicts in the Team Explorer of Visual Studio from a package

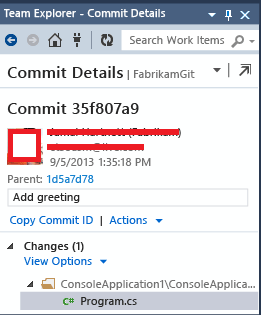
The Commit Details page contains the commit properties and Changes section:

TeamExplorerGitCommitDetails

To get that information from a package you need to use the Microsoft.TeamFoundation.Git.Controls.Extensibility.ICommitDetailsExt interface. See the article:

HOWTO: Get the Git Commit Details in the Team Explorer of Visual Studio from a package

MZ-Tools Articles Series: HOWTO: Get the Builds / Pending Changes in the Team Explorer of Visual Studio from a package

The two first samples that I have created about Team Explorer extensibility are about getting the information contained in the Builds and Pending Changes pages.

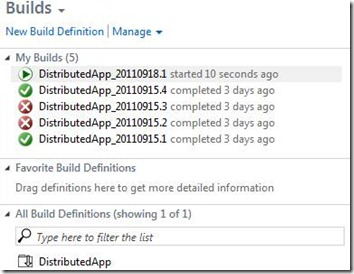
The Builds page contains three sections: My Builds, Favorite Builds Definitions and All Build Definitions:

TeamExplorerBuilds

To get that information from a package you need to use the Microsoft.TeamFoundation.Build.Controls.Extensibility.IBuildsPageExt interface. See the following article:

HOWTO: Get the Builds in the Team Explorer of Visual Studio from a package

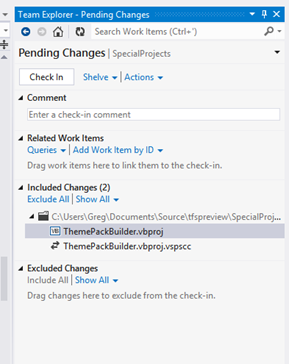
The Pending Changes page contains the Comment, Related Work Items, Included Changes and Excluded Changes sections:

TeamExplorerPendingChanges

To get that information from a package you need to use the Microsoft.TeamFoundation.VersionControl.Controls.Extensibility.IPendingChangesEx interface. See the following article:

HOWTO: Get the Pending Changes in the Team Explorer of Visual Studio from a package

New TFS Extensibility resources added to VSX site

A question in the MSDN VSX forum prompted me to investigate another area, Team Explorer extensibility, which I am not very familiar with yet. After solving the question, I wanted to learn more about Team Explorer / TFS Extensibility and I found quite a few resources that I didn’t have listed on this VSX site. Some resources that I have updated are:

  • In the Overview page, I have added an image from the MSDN documentation to illustrate the several client models, and clarified that you need the Team Explorer to get the client libraries even if you want a standalone application to connect to TFS.
  • In the Downloads page, I have added the links to download the Team Explorer packages for Visual Studio 2005-2013, which, by the previous paragraph, are required to get the client libraries for standalone applications that don’t extend the Team Explorer. The client model object assemblies and namespaces are quite confusing because some are Microsoft.TeamFoundation.* and some others are Microsoft.VisualStudio.TeamFoundation.*, and are located in at least three folders (ReferenceAssemblies\v2.0, ReferenceAssemblies\v4.5, and PrivateAssemblies of the root folder Program Files (x86)\Microsoft Visual Studio <version>\Common7\IDE). The MSDN documentation for Visual Studio 2012 has a nice mapping between assemblies and namespaces.
  • In the Articles section, I have added a couple of articles to extend the Team Explorer of Visual Studio 2012 / 2013, and an impressive collection of 56 articles about TFS API by MVP fellow Shai Raiten.

In the next posts, I will contribute myself explaining how to get information about the different pages / sections of the Team Explorer.

Three bugs in MSDN Walkthrough: Extending the Solution Explorer Filter

One of the things that I do from time to time is to take a question in the MSDN Visual Studio Integrate or StackOverflow forums about a subject of VSX that I am not very familiar with, and try to investigate and provide an answer. The other day I picked this one about extending the Solution Explorer filter with a custom filter, something that I didn’t know.

The question was that following the MSDN Walkthrough: Extending the Solution Explorer Filter the sample didn’t work for VS 2013 Update 4. I reproduced the issue and after some investigation I concluded that it was a bug in VS 2013, because the version of the Walkthrough for VS 2012 actually worked. I reported it to Microsoft Connect (the report seems to have been deleted now) and actually what was wrong was the MSDN sample, which should use the SVsServiceProvider parameter type (instead of IServiceProvider type) in this constructor:

public FileNameFilterProvider(SVsServiceProvider serviceProvider, ...)

There is now a MSDN feature suggestion to fix the code sample. But the sample has other two bugs:

  • The Utilities.cs class is no longer required, you can use the provided HierarchyUtilities class.
  • The command should not be bound with an event handler in the Initialize() method of the package. Its command guid/id are used as parameters in the SolutionTreeFilterProvider attribute to bind the command with the filter.

MZ-Tools Articles Series: HOWTO: Create a toolwindow WITHOUT a ToolWindowPane class in a Visual Studio package

The usual way to create toolwindows in a package is described in my last post HOWTO: Create a toolwindow with a ToolWindowPane class in a Visual Studio package. While with add-ins only a usercontrol was required, with packages you need the usercontrol and a class that inherits from ToolWindowPane. That is, two files. When I first learned this, I found it somewhat overkill. But when I started to migrate my MZ-Tools add-in to a package, which has quite a few toolwindows, I found it totally overkill. Furthermore, requiring to decorate the package with a ProvideToolWindow attribute for each toolwindow defeats the 3rd strategy that I exposed in Strategies migrating from Visual Studio add-ins to packages, in which a core plug-in provides the features (and therefore the usercontrols for toolwindows) and a host adapter provides the communication between the host (Visual Studio) and the core plug-in. The host adapter is not aware of the features implemented by the core plug-in, and therefore it shouldn’t use specific toolwindows classes or attributes. I am aware that the ProvideToolWindow attribute and the class that inherits ToolWindowPane serve a purpose which was not available for toolwindows created by add-ins: to show automatically when VS is launched the toolwindows that were open in the last VS sessions. So, the initialization of the toolwindow must be contained in a class and not in the “click event” of the command that shows the toolwindow. But it happens that add-ins can provide that functionality too with minimal effort: when unloaded the add-in stores which toolwindows were open and when it is loaded again it shows them. Version 7.0 of MZ-Tools, being an add-in, offered this feature since it was released in 2012.

So, I wanted to create toolwindows in my MZ-Tools package like I was doing in my MZ-Tools add-in. While you can use the automation model (EnvDTE) from a package, alas, the EnvDTE80.Windows2. CreateToolWindow2 method is among the few ones that cannot be used from a package because it requires an EnvDTE.AddIn parameter, that a package cannot provide. Fortunately, the the IVsUIShell interface provides a CreateToolWindow method that can be used from packages. In this new article (equivalent to HOWTO: Create a dockable toolwindow from a Visual Studio .NET add-in) I show how to use it:

HOWTO: Create a toolwindow without a ToolWindowPane class in a Visual Studio package
http://www.mztools.com/articles/2015/MZ2015005.aspx

MZ-Tools Articles Series: HOWTO: Create a toolwindow with a ToolWindowPane class in a Visual Studio package

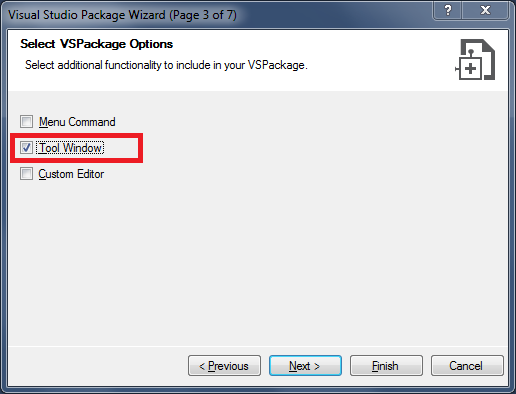
Creating a package with a toolwindow using the package wizard is easy because the wizard provides you an option to do it:

PackageWizard

However, the steps to create a second toolwindow are not evident. And even if you figure out the steps, knowing what they do may be difficult. And if you come from the add-ins space (where toolwindow creation uses an easier approach), toolwindows of packages is difficult stuff. This question has appeared twice in the StackOverflow forum in the last days.

I have written the following article to explain the stuff generated by the wizard when you request the toolwindow option, how the pieces are connected, and why each piece is required:

HOWTO: Create a toolwindow with a ToolWindowPane class in a Visual Studio package
http://www.mztools.com/articles/2015/MZ2015004.aspx

In my next post/article I will explain a different approach to create toolwindows in a package, without a ToolWindowPane (hence the title of this article).

MZ-Tools Articles Series: BUG: Toolwindow guid attribute value hardcoded in code generated by Visual Studio package wizard

I am these days working on a couple of articles about toolwindows. As you know, the package wizard has an option to create a toolwindow for you that creates a lot of stuff with guids, ids, attributes and so on. One thing that you notice when you learn about packages with commands is that there are duplicated declared Guids for the package guid and command set guid in the .vsct file (<symbols> section, guidVSPackagePkg / guidVSPackageCmdSet guid symbols) and in the Guids.cs file (guidVSPackagePkgString / guidVSPackageCmdSetString constants). That duplication is unfortunate but required, because those two files are compiled by different tools (the .vsct file is compiled by the Vsct.exe tool of the VS SDK and the Guids.cs file is compiled by the C# compiler). However, when you create a package with a toolwindow, you get a third guid value duplicated, but that duplication is not required.

I have documented it in this article:

BUG: Toolwindow guid attribute value hardcoded in code generated by Visual Studio package wizard
http://www.mztools.com/articles/2015/MZ2015003.aspx

and I have opened a bug report at Microsoft Connect:

VS SDK package with toolwindow: constant guid not used in code, hard-coded guid instead
https://connect.microsoft.com/VisualStudio/feedback/details/1138161/vs-sdk-package-with-toolwindow-constant-guid-not-used-in-code-hard-coded-guid-instead

To prevent the problem in the future packages that you create with toolwindows, you can fix the templates by yourself as explained in my article HOWTO: Changing the source code of Visual Studio Package project templates.

And since I have verified that this problem exists in the templates of the package wizard since VS 2005, chances are that if your package uses toolwindows it has the duplicated guid value if you haven’t noticed it.

How Visual Studio names controls when dropped on a form from the toolbox

One popular feature of my MZ-Tools extension allows you to apply custom default properties to a new Windows Forms control (either when it is dropped on a form from the toolbox or on demand clicking a button). It happens that when your extension is notified that a new control has been added to a form or usercontrol with the IComponentChangeService.ComponentAdded event, to guess if the controls is “new” or not (pasted, undo, etc.) is very tricky. One of the checks that I use to guess if the control is “new” is to check if its name has the pattern typename+number(such as “TextBox1”) because it is unlikely that an existing control has remained with the final number. As you know, given a typename such as “TextBox”, in VB.NET the default control name would be “TextBox1” and in C# it would be camel case “textBox1”. This has been working well all these years but last week a customer reported me that using the Janus controls the feature didn’t work. It happens that Janus has controls whose type name is something like “UIButton”, “UIGroupBox”, etc. So, given that typename, which name does Visual Studio assign to a new control? The answer is the following:

  • For C#, it assigns names like “uiButton1” (but not “uIButton1”)
  • For VB.NET, it assigns names like “UiButton1” (but not “UIButton1”)

Since I am the kind of person that likes to know how and why things work, I was curious about how and where Visual Studio applies those naming rules. So, I used .NET Reflector to debug the Visual Studio assemblies. The most difficult part was to guess which assembly to debug and where to put a breakpoint. I succeeded and soon I found the System.ComponentModel.Design.Serialization.CodeDomDesignerLoader class (in the System.Design.dll assembly) that implements the INameCreationService interface whose CreateName(IContainer container, Type dataType) method is used by the Windows Forms designer to generate the name. This method:

1) Takes the name of the type of the control and converts to lower case:

a) The initial character

b) Subsequent characters if they are upper case, until the last upper case character:

string name = dataType.Name;
StringBuilder builder = new StringBuilder(name.Length);
for (int i = 0; i < name.Length; i++)
{
   if (char.IsUpper(name[i]) && (((i == 0) || (i == (name.Length - 1))) || char.IsUpper(name[i + 1])))
   {
      builder.Append(char.ToLower(name[i], CultureInfo.CurrentCulture));
   }
   else
   {
      builder.Append(name.Substring(i));
      break;
   }
}

2) Appends a unique number
3) Calls the code generator to create a valid identifier:

str = this._codeGenerator.CreateValidIdentifier(str);

In turn, this code generator is the Microsoft.VisualStudio.Design.Serialization.CodeDom.VSCodeDomGenerator class (in the Microsoft.VisualStudio.Design.dll assembly) that can use the camel (C#) or VB.NET case (depending on the value of the property __VSHPROPID.VSHPROPID_DesignerVariableNaming of the IVsHierarchy of the designer) converting just the first character (not subsequent ones!)

public string CreateValidIdentifier(string value)
{
   string str = this.innerGenerator.CreateValidIdentifier(value);
   if ((str != null) && (str.get_Length() > 0))
   {
      switch (this.VariableNaming)
      {
         case VSDESIGNER_VARIABLENAMING.VSDVN_Camel:
            return (((char) char.ToLower(str.get_Chars(0), CultureInfo.InvariantCulture)) + str.Substring(1));

         case VSDESIGNER_VARIABLENAMING.VSDVN_VB:
            return (((char) char.ToUpper(str.get_Chars(0), CultureInfo.InvariantCulture)) + str.Substring(1));
      }
   }
   return str;
}
Why to become a Microsoft Visual Studio Industry Partner (VSIP) “Basic” level

Microsoft has been offering the Visual Studio Industry Partner Program (VSIP Program: https://vsipprogram.com)  since many years ago. Initially there was a single level that required a fee, but soon it was offered in three levels (Affiliate, Alliance, Premier), being the first one free (complimentary). Later, the Affiliate level was transformed into the Basic level, still being free. Somehow, I have spent all these years without becoming an “Affiliate” or “Basic” partner, despite developing and selling my MZ-Tools product and being heavily involved in Visual Studio extensibility since 2002. I think there were several reasons:

  • To develop add-ins, the VS SDK was not required (until VS 2013).
  • Even if you develop packages, the VS SDK and documentation is public and free.
  • MSDN provides documentation to develop add-ins or packages. The documentation was not very good at first, but improved over time.
  • You have forums (newsgroups, Yahoo, MSDN, StackOverflow, etc.) to ask questions and get technical support.
  • You have also blogs from the VS team to learn new things about Visual Studio (or TFS or Visual Studio Online).
  • Soon I became a provider of technical help for add-ins in forums and my blog and articles, complementing the official documentation ;-). I have entered the VS SDK packages area very late (forced by VS 2015).
  • You have Microsoft Connect to report bugs. I have reported dozens and many have being fixed by Microsoft before the RTM versions of Visual Studio.
  • Being an MVP since 2004, I have access to restricted information and private VS CTPs and previews from Microsoft.
  • I do VSX development, blogging and forum support at spare time (I have an unrelated daily job), so I miss some things.
  • Being a developer at heart, I did not appreciate enough the marketing side of the VSIP offering (my fault).
  • There were at least two years (2008 and 2009) when the videos of the annual VSIP Summit conference were publicly available after the event.
  • And Microsoft is now a much more open company than it was a decade ago, even embracing open source, so you receive much and frequent information.

So, why did I join for the “Basic” level of the VSIP program last week? It all started some weeks ago when I became fully DPI-aware. I have been fixing many DPI issues of MZ-Tools 7.0 for the next version 8.0 (to be launched with VS 2015) but there was an area that I didn’t know how to fix it: the high resolution images in toolbars, menus and context menus. I was aware that the new Visual Studio 2015 will provide high resolution images because it was stated in the release notes of CTP 3. But which would be the mechanism for extensions to provide them? This has not been documented yet in MSDN or the Visual Studio blog, so I thought that the answer would be inside the VSIP program. Specifically, I thought it would be in the videos of the VSIP Summit conference, which are no longer public since 2010. So, I registered for the basic level of the VSIP program, and I was right. The information is under Non-Disclosure Agreement (NDA) so I can’t publish it here, but if you register for the Basic level, and (once approved by Microsoft in 72 hours) you locate the Summit 2014 presentations (under Resources > Additional Resources, or in the August 2014 newsletter), there is one about Visual Studio extensions and high DPI displays.

So, if you are a small developer or ISV with a Visual Studio extension, to summarize and encourage you to become a VSIP partner “Basic” level for free, these are the valuable benefits that you get:

  1. Access to the private VSIP Summit presentations (PowerPoint and videos), even from the past year.
  2. The monthly newsletter.
  3. The partner directory listing (you can’t use the Visual Studio partner logo, though, that requires the Alliance level).

VS SDK, packages, add-ins, macros and more…