This first thing that I noticed (very horrified) when I installed Visual Studio and my MZ-Tools extension in the new MacBook Pro 13″ Retina that I purchased last month was that at 100% scaling (96 Dpi) everything looked very tiny and at 150% (144 Dpi) or 200% (192 Dpi) scaling MZ-Tools looked horrible with very wrong layouts. In some Visual Studio versions (such as VS 2008) it looked better. And since MZ-Tools also works with the VBA editor and VB6/VB5 I also tested with different results. At that point I became DPI-aware and read everything I found about Windows and DPI, which is a lot because it is quite complex and tricky. So, if you are not DPI-aware yet, I urge you to buy a retina external monitor or a retina laptop so that you can set at least 200% scaling (better than 150% scaling) to do some tests and fixes and avoid a painful experience. A “large” monitor such as the one of the iMac 27″, that I also own, doesn’t qualify if it is not the new retina model. In the future, especially with Visual Studio, two screens would be needed for better tests with “per-monitor DPI” awareness introduced by Windows 8.1 once Visual Studio supports it.
First, I will introduce some resources that explain better than me DPI-awareness and Windows OS support:
To summarize:
- Windows XP used a pseudo-DPI scaling (fonts and some other UI items)
- Windows Vista (and Windows 7 and Windows 8) introduced true DPI-scaling with the following notes:
- The same DPI is used in all the monitors of a computer (this is called “system DPI”).
- An application must declare through a manifest (embedded in the executable or in an .exe.manifest file, or even by code) its DPI-awareness.
- If an application lacks the manifest, or states that it is not DPI-aware, then the OS scales the application as a bitmap (something called “DPI virtualization”) while the application still thinking that is running at 100% scaling (96 dpi).
- Windows 8.1 introduced “per-monitor DPI”, where each monitor can have a different DPI and an application is notified of a change in the DPI when moved to another monitor, so that it can accommodate the new display.
Given that your extension is hosted in an application (Visual Studio), you don’t have the chance of declaring anything about the DPI awareness of your extension, you are conditioned by the DPI-awareness of the Visual Studio version that is hosting your extension.
To know the DPI-awareness of an executable (such as devenv.exe of Visual Studio) you can use these approaches:
- At design-time, you can see if the .exe file is accompanied by an .exe.manifest file (this is the approach used by Office applications):

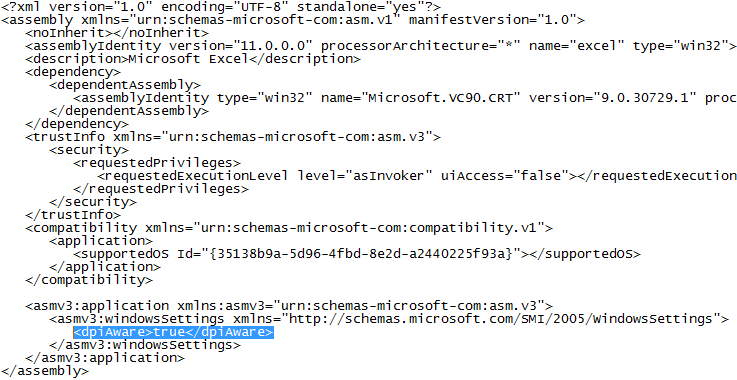
Or you can open the .exe file with Visual Studio (“File” > “Open” > “File…” menu) and search for a “RT_MANIFEST” resource (this is the approach used by Visual Studio):

- At run-time, you can use Process Explorer and configure it to show the “DPI Awareness” column:
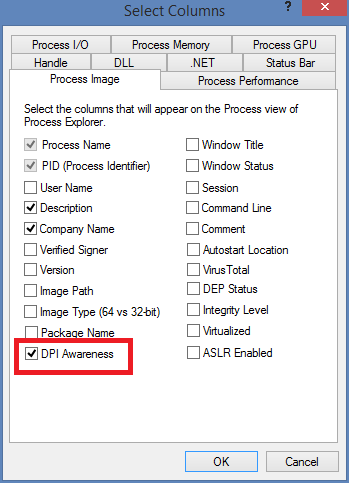
The results are as follows on Windows 8.1:
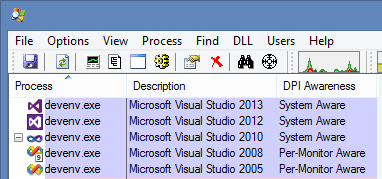
- Visual Studio 2005 and 2008 don’t state DPI-awareness in any manifest (embedded or otherwise) but sometimes are shown in Process Explorer as “Per-monitor aware”, for some reason that I haven’t found yet. Certainly they are not “Per-monitor DPI-aware” (not even “System DPI-aware”).
- Visual Studio 2010 and higher state “System DPI-awareness” through an embedded manifest (but not per-monitor DPI awareness on Windows 8.1).
The bottom line is that since Visual Studio 2010 your extension must be at least “System DPI-aware” and even earlier for that issue with VS 2005/VS2008. Microsoft enhanced the DPI handling in VS 2013, and even more with high-resolution icons in VS 2015.
When ensuring DPI-awareness, you need to address three aspects:
- Once the form or toolwindow is scaled, the layout of controls must be correct, that is, without overlapping controls or clipping out of boundaries.
- The size of controls that show images must be scaled according to the actual DPI. Visual Studio does this with the toolbars and menus, but you must do it for the rest of your user interface. This includes graphic buttons on your own toolbars, pictureboxes, images on treeviews, listviews, etc. For example, what at 100% scaling measures 16×16 pixels must measure 32×32 pixels at 200% scaling. At this point we are talking only about resizing the container stretching the contained image. This point and the previous one guarantee that your extension doesn’t have usability issues with clickable controls at high scaling (such as tiny toolbar buttons or checkboxes on treeviews/listviews)
- Ideally, you should provide high-resolution images for scaled containers of images of the previous step. That is, if a button holds a 32×32 image at 200% scaling, you should provide a 32×32 image and not a stretched 16×16 image. If you are a perfectionist and have a lot of time you should provide the following dimensions for the images:
- 16×16 pixels at 100% scaling (96 Dpi)
- 20×20 pixels at 125% scaling (120 Dpi)
- 24×24 pixels at 150% scaling (144 Dpi)
- 32×32 pixels at 200% scaling (192 Dpi)
- 40×40 pixels at 250% scaling (240 Dpi)
- etc.
In practice, you can compromise providing just 16×16 and 32×32 resolutions and stretch images for resolutions that you don’t provide.
Now, how to provide DPI-awareness in your extension depends on the technology that you are using: it is said that it is easier with Windows Presentation Foundation (WPF) but if you created your extension back in VS 2005 chances are that you are still using Windows Forms. The good news is that you can achieve excellent DPI-awareness with Windows Forms, even with .NET Framework 2.0. I say this because in newer versions of .NET Framework (since 4.5) a Windows Forms app can opt-in for better DPI handling.
I have found several issues in the last weeks that I have been working on this and I have resolved all of them to my complete satisfaction:
- First of all, ensure that all the designers of your forms and usercontrols include the following two lines. This is especially important if your extension has evolved from an add-in created back in VS.NET 2002/2003 because .NET Framework 1.0 / 1.1 used an inferior scaling mechanism with other deprecated properties:
this.AutoScaleDimensions = new System.Drawing.SizeF(6F, 13F);
this.AutoScaleMode = System.Windows.Forms.AutoScaleMode.Font;
- You may need to scale some controls at run-time, depending on how they are added to the user interface.
- You may need to adjust at run-time some widths and heights, especially if you are using the SplitContainer control.
- You need to scale hard-coded dimensions in pixels that you may be using in your code for performing layouts at run time.
- You need to scale pictureboxes according to the actual DPI.
- You need to provide 32×32 size imagelists (either with 16×16 scaled images or, preferably, 32×32 native images)
- You need to adjust the ItemHeight property of treeviews.
- You need to adjust the dimensions of toolstrip buttons with the ToolStrip.ImageScalingSize property.
- Avoid the use of the StateImageList property of the TreeView control, because in .NET Framework 4.0 or lower it’s always 16×16, and in .NET Framework 4.5 or higher the application can opt-in for a DPI-aware StateImageList, but your extension cannot. Instead you can use the Win32 API for TreeView controls to set the state imagelist and image index for nodes, as it was the case in .NET Framework 1.0 / 1.1, whose TreeView control lacked the StateImageList property.
- You need to adjust the width of the columns of the listviews because they are not adjusted automatically in high DPI scaling. I had already coded this (because I hate columns that don’t adjust automatically to the contents).
- The glyph of Radiobutton and Checkbox controls is scaled automatically if visual styles are enabled, as it happens with Visual Studio. For some reason, in the VBA editor of Office they are not enabled so a call to the System.Windows.Forms.Application.EnableVisualStyles method is required.


